
Showing posts with label Tutorials. Show all posts
Showing posts with label Tutorials. Show all posts
 Your blog should look like this. But why it doesn't?
 The most typical mistake is, that the template is not Minima, all my backgrounds are designed to work with Minima template. To change the template, go to customize (right upper corner).
 Pick the Minima template, it's the first one. With Minima the whole background looks like it should look.
 One other quite common mistake with the headers or the buttons is, that there is not transparent background.
 The images with transparent background are in .png format, you must remember when you save them to your computer, that you save them in .png format, if you save them as .jpg, the background will be white.
An other thing you must remember with transparent background images, that you don't let Blogger shrink them, make sure you don't have check on "Shrink to fit". I make my headers and buttons right size to fit your blog without shrinking.
I'm not sure if I remembered everything, feel free to ask more, if these instructions don't help.
Edit.
This has nothing to do with posting the images. You can post also images in .png format to your blog posts, and then you can choose there any size you like, the background will remain transparent. The right size is only important with the header image and the images you add to your sidebar with image gadget.

Why the background or header don't look like it should?
If you want to add a link to your comment, it's really good to make it easy to use. If you first have to copy the link and then paste the address, it's way too complicated, so better learn this very simple, but practical trick.
So only thing you need, is this simple code:
<a href="link">text to click on</a>Here is a sample, I will make a comment to this post and will add this link below there, so you see how it looks, click the link on my comment and you should get back to this post:
<a href="http://blo64rt.blogspot.com/2009/07/how-to-add-link-to-your-comment.html">how to add link</a>
How to add link to your comment
 I will show now, how I usually do the coloring.
 First I want to decrease saturation a little bit.
 I use this saturation/hue/lightness tool quite much. There is many other tools you could do the same thing, but I like this.
 Next I take a paint brush.
 And choose the fuzzy soft head.
 Then I choose the color I want to add. I put the opacity very low, usually I use it between 8 - 18 %. I want to use very thin layers of the color, the brush stroke become much more smooth.
 Usually I do first the skin color, little by little.
 Then I use the other colors, but also very thin coat.
 Later, when I've finished the coloring, I usually add more saturation, or sometimes I might diminish color from some parts. And once more little by little with low opacity. This tool is great, when you want just adjust some parts of the image.
 And sometimes I want to darken or lighten some details.
 Here is now the ready colored image.
 I wanted to add this time more contrast to it. If you want to adjust the whole image, you find really useful tools from these adjust tools. You can adjust color balance, contrast, saturation, hue etc.
This is now the final result, but maybe I could add one more cool detail...

I open the new image, this time a damask pattern, and I choose the paint brush again.
 But this time, instead of the solid color, I choose to use pattern.
 I start coloring the bandana, once more little by little, and I vary the scale and the angle to get the look natural.
 Ok, this is now enough. If you have anything to ask, please do, I'm happy to answer to any questions.
Paint Shop Pro Tutorial - Coloring the image
Previous tutorial was about how to cut an image from the multicolored background. This tutorial is for cutting the image from the solid color background. It's a little bit faster and simpler.
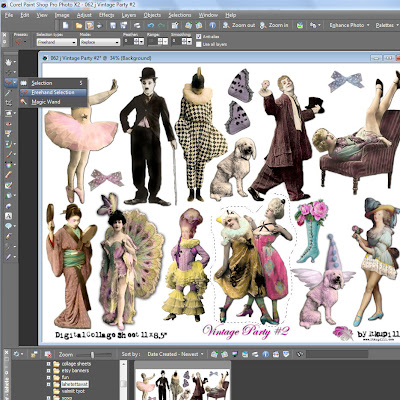 First you cut the image with selection tool > freehand selection and then copy and paste as a new image.
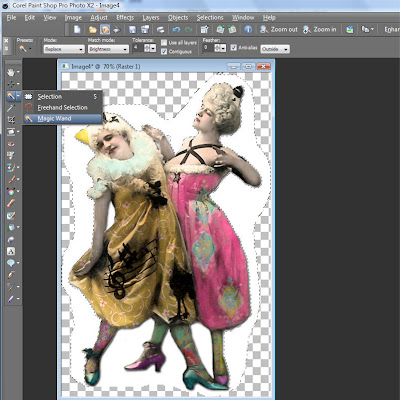 Then choose selection tool again, but this time magic wand. (You can adjust the tolerance of the magic wand to find suitable for your needs).
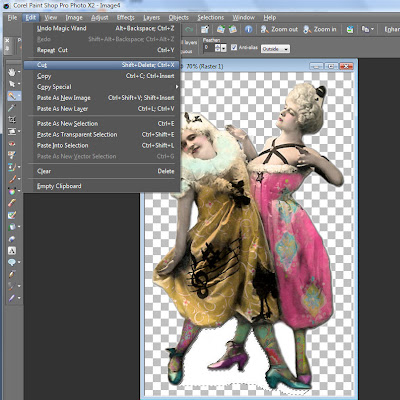 Place magic wand one by one onto all white areas, then cut, and the white parts are gone.
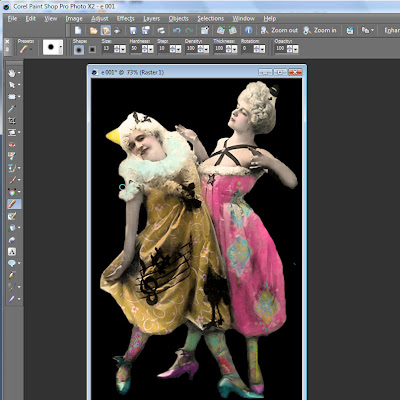 Sometimes the image is quite ready already after magic wand, but to make sure you should add a new layer behind the image, first black and then white to get rid of the all remaining background around the image. Erase all disturbing stuff around the image. (See the previous tutorial).
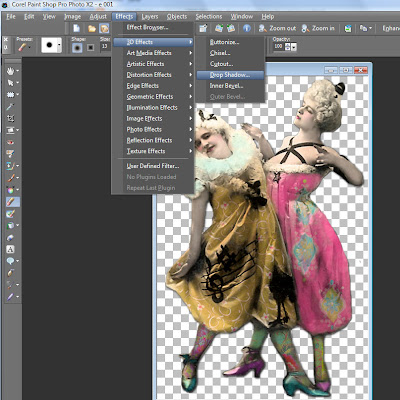 When the image is cut out, you can add little bit drop shadow, if you like. And remember save the file as .png, so you hard work don't go to waste (see previous tutorial).
Many times for example the collage sheets comes with solid white background and this is quite easy way to get images proper to digital working.
I used as an example my digital collage sheet Vintage Party #2, but then I cheated, I used in the last picture the ready cut .png file from the digital design kit Grunge and Crazy. I have already once cut it, so I didn't had nerve to do it twice. Both digital collage sheet and the digital design kit (for lazy digital artists) are available on my Etsy Shop.
 First you cut the image with selection tool > freehand selection and then copy and paste as a new image.
 Then choose selection tool again, but this time magic wand. (You can adjust the tolerance of the magic wand to find suitable for your needs).
 Place magic wand one by one onto all white areas, then cut, and the white parts are gone.
 Sometimes the image is quite ready already after magic wand, but to make sure you should add a new layer behind the image, first black and then white to get rid of the all remaining background around the image. Erase all disturbing stuff around the image. (See the previous tutorial).
 When the image is cut out, you can add little bit drop shadow, if you like. And remember save the file as .png, so you hard work don't go to waste (see previous tutorial).
***
Many times for example the collage sheets comes with solid white background and this is quite easy way to get images proper to digital working.
I used as an example my digital collage sheet Vintage Party #2, but then I cheated, I used in the last picture the ready cut .png file from the digital design kit Grunge and Crazy. I have already once cut it, so I didn't had nerve to do it twice. Both digital collage sheet and the digital design kit (for lazy digital artists) are available on my Etsy Shop.
Paint Shop Pro tutorial, How to cut image from solid color background
There are millions of ways to cut the image from background, and if you have found nice and easy way to do it, you don't have to change it. I just want to show you how I do it.
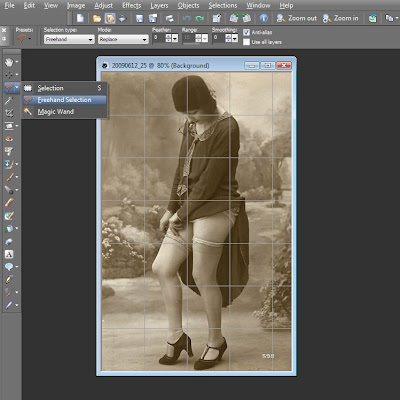 First I choose selection tool > freehand selection
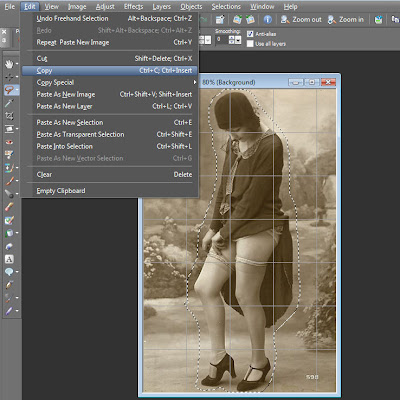 I go around the image, not too carefully. I don't want to waste time with this, cause I think it's almost impossible to go so carefully around the image, that there is nothing to erase.
I copy the image and the paste it as a new image.
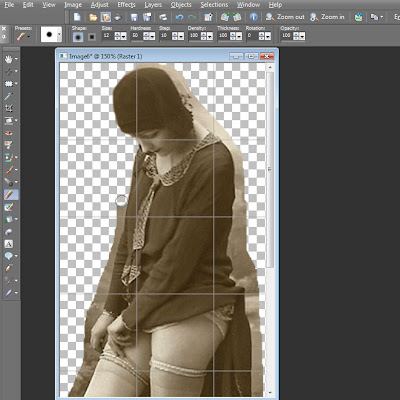 Now I start erasing around the imag, there is many different heads for eraser tool, I used +round 10. Opacity must be 100 %. First I go around and erase the easiest part with larger eraser, and the at last I go to details with smaller eraser size.
 Now image looks already quite ready.
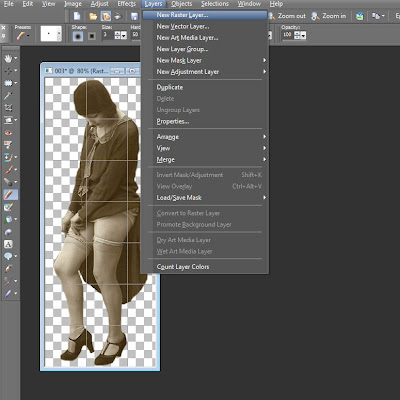 But I want to make sure, that the image looks fine in all different backgrounds. So I add a new layer and choose black color to that new layer. Make sure that you have the image and background in different layers.
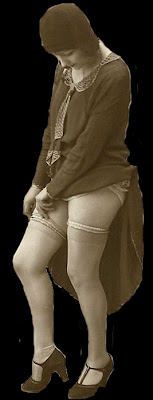 You can see, that there is still something to erase. I go around once more with small eraser.
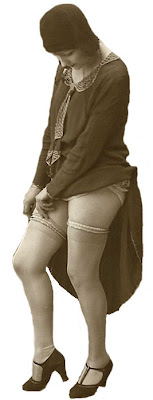 And then I change the color of the background layer. There is still left some disturbing stuff from the background. So I go around once more and try to erase all that stuff away. When you satisfied with the image, delete the background layer.
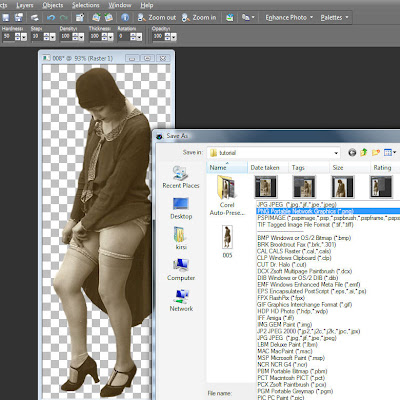 You must save the image without the background as a PNG Portable Network Graphics (*.png). If you save your image as .jpg all your hard work is gone for the waste, your image will have a white background, but as .png file, your image has a transparent background.
 Now the image is cut out from the background quite successfully and saved as .png file. It still need some retouch and coloring perhaps...
 First I choose selection tool > freehand selection
 I go around the image, not too carefully. I don't want to waste time with this, cause I think it's almost impossible to go so carefully around the image, that there is nothing to erase.
I copy the image and the paste it as a new image.
 Now I start erasing around the imag, there is many different heads for eraser tool, I used +round 10. Opacity must be 100 %. First I go around and erase the easiest part with larger eraser, and the at last I go to details with smaller eraser size.
 Now image looks already quite ready.
 But I want to make sure, that the image looks fine in all different backgrounds. So I add a new layer and choose black color to that new layer. Make sure that you have the image and background in different layers.
 You can see, that there is still something to erase. I go around once more with small eraser.
 And then I change the color of the background layer. There is still left some disturbing stuff from the background. So I go around once more and try to erase all that stuff away. When you satisfied with the image, delete the background layer.
 You must save the image without the background as a PNG Portable Network Graphics (*.png). If you save your image as .jpg all your hard work is gone for the waste, your image will have a white background, but as .png file, your image has a transparent background.
 Now the image is cut out from the background quite successfully and saved as .png file. It still need some retouch and coloring perhaps...
Paint Shop Tutorial - How to cut image from background
 Picture tubes is one of my favorite tools, and now I show how to make them, actually that very easy, more difficult is cut the images out of the background. But here is now a ready cut flowers for you to try. Right click the flower basket and copy it to your computer, or you can of course use something else. But I show now the easy steps...
 1. Go to layers and open New Raster Layer
 2. Click OK this defauld window
 3. Go to Merge, then choose Merge Visible
 4. Go File > Export > Picture Tubes
 5. Use these default setting and give name for you Tube. Click OK, and you have a new Picture Tube ready to use.
 If you want now to use your picture tube, I recommend first add a new layer, cause if you add a picture tube straight to the background, it's on the same layer than background. Therefor you can't edit the tube, but if you have it on the other layer, you can do what ever you want with it.
 So now you can choose your picture tube, you can easily scale to right size from 10% to 250%.
 And now, when you have the picture tube on it's own layer, you can edit it.
 You can for example add drop shadow, or anything you like.
 Here is now a simple sample, but now only your imagination can limit the possibilities to use picture tubes.
I know, my instructions are always funny, cause my English is so limited. If you don't understand something or want to know more, feel free to ask.
Paint Shop Pro Tutorial - How to make picture tubes
Subscribe to:
Posts
(
Atom
)


